55 lines
4.0 KiB
Plaintext
55 lines
4.0 KiB
Plaintext
=== GoToMyAccounts SSO ===
|
|
Contributors: (marksauer)
|
|
Tags: QuickBooks Desktop, QuickBooks Online, GoToMyAccounts, Customer Portal, SSO
|
|
Requires at least: 4.6
|
|
Tested up to: 5.6.1
|
|
Stable tag: trunk
|
|
Requires PHP: 5.2.4
|
|
License: GPLv2 or later
|
|
License URI: https://www.gnu.org/licenses/gpl-2.0.html
|
|
|
|
The GoToMyAccounts Single Sign On plugin for WordPress allows you to have direct links into your customer portal for any logged in WordPress user.
|
|
|
|
== Description ==
|
|
|
|
The GoToMyAccounts Single Sign On plugin for WordPress allows you to have direct links into your customer portal for any logged in WordPress user.
|
|
Your WordPress user's email must match the corresponding user's email address in the GoToMyAccounts web portal.
|
|
|
|
== Installation ==
|
|
|
|
* To enable the plugin, login to your GoToMyAccounts web portal (requires admin permissions). On the left side menu, click Integrations, and then click "SSO Tokens".
|
|
* On the SSO Tokens page, you can create new tokens and remove existing tokens. **You cannot edit or view existing tokens**. This is a security feature. Because of this, you must copy the token and save it in a safe place. Or, just paste it into the WordPress plugin settings page. If you need to generate a new token later, its as easy as coming back to the SSO Tokens page.
|
|
|
|
${youtube}[How to generate Single Sign On (SSO) Tokens](sgffkZJkn5o)
|
|
* Once you have the SSO token, you will want to login to your WordPress admin site.
|
|
* Go to the Plugins page and then click "add New".
|
|
* Search for GoToMyAccounts Single Sign On" and then add the Plugin.
|
|
**(Note: We are in the process of publishing the plugin. If it is not published yet on WordPress, you can manually download it at [https://www.gotomyaccounts.com](https://www.gotomyaccounts.com) )**
|
|
|
|
${youtube}[GoToMyAccounts Single Sign On WordPress Plugin](yF0Py7JNbSA)
|
|
* After adding the plugin, be sure to "activate" the plugin.
|
|
* You will now have a new item in your settings menu called "GoToMyAccounts SSO". Click that menu item.
|
|
* On the settings page, you need to first populate two items. Set your web portal address (without http:// or https://) (Also do not place any trailing "/"). Example: myportal.gotomyaccounts.com.
|
|
* Next, paste in the SSO token you created in an earlier step.
|
|
* Save these settings
|
|
* Now let's create the first SSO link. Go to Pages and create a new page.
|
|
* Name your page whatever you like, but for this example let's call it "Customer Dashboard".
|
|
* Save the page. You do not need to enter any content. This page is simply a placeholder for the redirect.
|
|
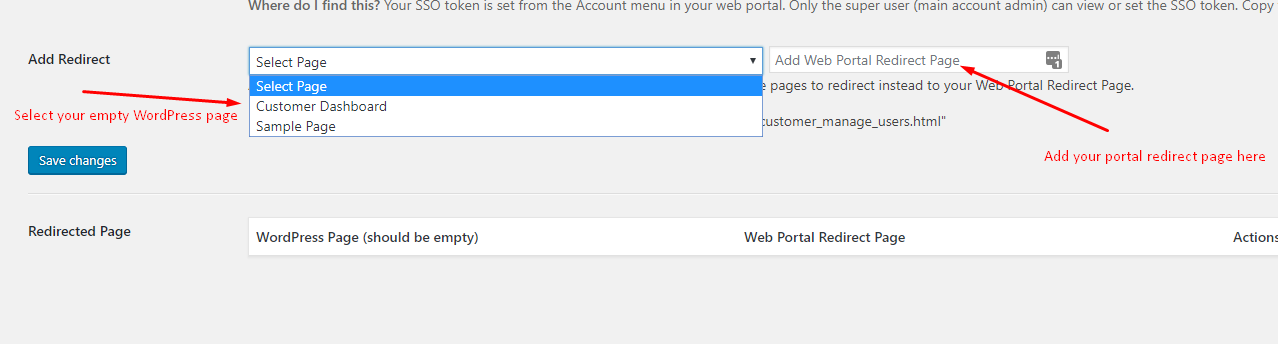
* Now go back to the GoToMyAccounts SSO settings page and we will add the redirect.
|
|
* The dropdown list of pages should now contain the page you just created.
|
|
|
|
|
|
* Select the page, and then enter the web portal page that it will redirect to. In this example, we will enter "customer_dashboard.html". But you can enter any valid portal page that your user can access.
|
|
* Click "save"
|
|
* Now that we have the redirect created, let's add that page to a menu and try it.
|
|
* In your WordPress admin site, Select "Appearance", and then "Menus".
|
|
* Choose an active menu to work with (or create a new one if you don't have any).
|
|
* Select the "Customer Dashboard" page we just created and then click "Add to Menu".
|
|
|
|

|
|
* Adjust the menu ordering as needed, and then save the menu.
|
|
* You are now ready to test the menu item and the redirect.
|
|
||| **Make sure you are logged in with a WordPress account that has an email matching a customer in your web portal. Again... the emails need to be the same, or the SSO authentication will be rejected.**
|
|
* When clicking on the Customer Dashboard menu item, the SSO plugin should work its magic and redirect you directly to the customer dashboard page.
|
|
| Tip: In your GoToMyAccounts portal, you should also create custom menu items that allow your users to go back to your WordPress pages. You can set that up in your GoToMyAccounts settings.
|